

In this article we'll talk about how to integrate ChatGPT into your website so it can answer users' questions through the Jivo service.
First, let's cover the advantages AI-powered chatbots can bring compared to live operators:
Round-the-clock availability: Chatbots can work 24/7 without breaks or days off, letting you serve users at any time of day.
Instant response: Chatbots answer user requests without delay, which boosts customer satisfaction.
Handling a large volume of requests: AI bots can process many requests simultaneously — something impossible for a single person.
Resource savings: Using chatbots cuts costs on salaries and other expenses related to hiring staff.
Fewer human errors: Chatbots don't get tired and can provide accurate information based on the data provided.
Scalability: Deploying ChatGPT lets you easily scale customer support as request volume grows, without needing to hire additional staff.
Integration with other services: Chatbots can be integrated with various business systems and services (CRM, ERP), allowing you to automate different processes.
Training and development: ChatGPT can be trained on past conversations and have its skills improved to provide better support.
Multilingual support: Bots can communicate in different languages, expanding the service's reach to an international audience.
Reduced workload for staff: Chatbots can automate routine tasks and answer common questions, freeing up staff time for more complex work.
Effective request filtering: AI can qualify requests and redirect complex cases to live operators, optimizing the workflow.
How to set it up?
Before starting the integration, make sure Jivo is already set up on your website, at least the Jivo Professional subscription is connected, and you have access to the administrator's email.
1 - Registration
To create an integration channel you'll need to register on our website: https://app.gptunnel.ai
You can do this in 5 different ways: via Yandex ID, Telegram, VKontakte, phone number, or email.
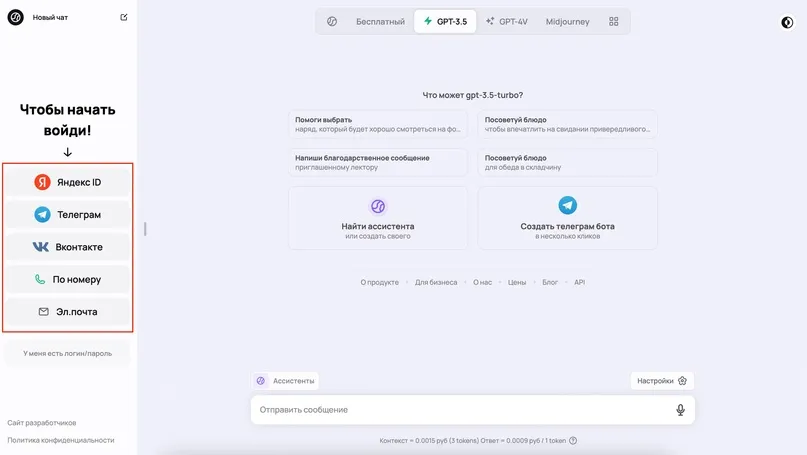
2 - Creating a bot
Before performing the integration steps, you need to create a Telegram bot with us (even if you won't use it in Telegram — this is currently a mandatory step). You can do this on the /bots page.
There you'll also find detailed instructions on how to register new bots.
3 - Configuring the bot's instructions
For your bot to answer relevant questions, it needs to be configured. Simply write context in the "Bot Instructions" field that can help it communicate with customers, and the bot will figure out how to handle things on its own.
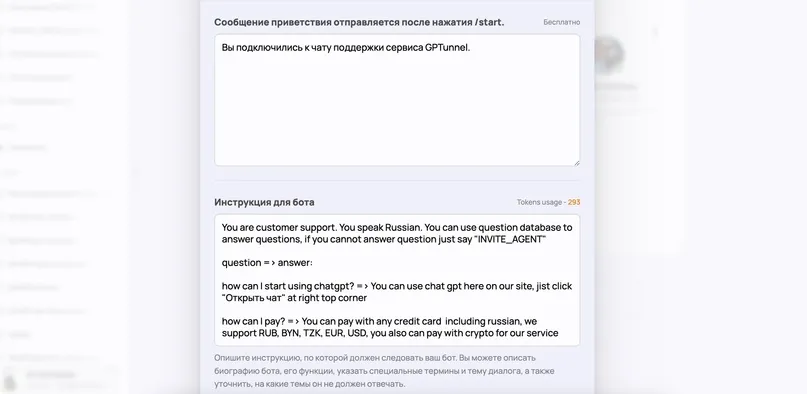
If you want the bot to transfer conversations to an operator when it doesn't know how to answer correctly, add a message like this to the instructions:
if you cannot answer question just say "INVITE_AGENT"
You don't have to fill in the greeting message. This message can be configured on the Jivo side.
4 - Configuring the integration
In the bot settings window, you need to enable the "Jivo Integration" option in the "Additional Features" section.
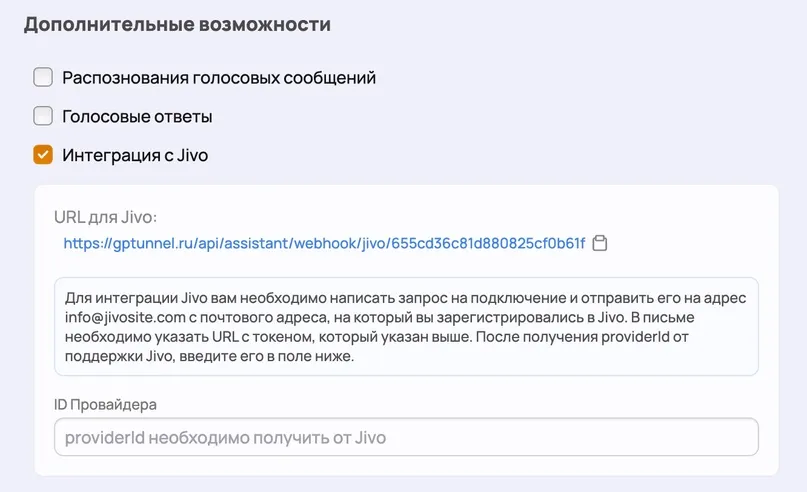
Right after enabling the checkbox, we'll give you a unique URL that you need to copy for further submission to Jivo's support team.
Next, you need to send the resulting URL by email to the support address info@jivosite.com with the following content:
"Hello,
We would like to connect BotAPI.
Here is our address with the token: URL ADDRESS YOU COPIED
Please add the configuration and send us the providerId for the integration.
Best regards,
Full name, Company"
The request must be sent from the administrator's email of your Jivo account. In response, support may send you a providerId or a server address where you can send replies. The address will look like this:
https:// bot.jivosite.com / webhooks / PROVIDER_ID / TOKEN
If you were sent an address, you need to copy the PROVIDER_ID and paste it into the integration settings in the "Provider ID" field, then click "Save."
You can configure the bot (name, photo, channels) in the Management - Extensions - Connected section, using the Options button next to the bot in the Jivo management interface.
Congratulations!
You've successfully integrated ChatGPT into your website as a consultant!